Archive for September, 2008

Football photography X’s and O’s, Part 3: Lighting Situations

One dramatic difference you’ll while shooting a football game is how the light changes if you’re shooting a game that overlaps the sunset. This first game I shot ran the full gamut from daylight to sunset/shade to stadium lights. Experienced sports shooter should already known to shoot in aperture priority, but for those who are relatively new to this sort of thing, see this post for some points about exposure technique for outdoor sports using aperture priority.

Daylight

Anyhow, full daylight creates problems with extremely harsh shadows, particularly on player’s faces under helmets and such.  The problem is exacerbated if you’re shooting at an angle where the player is backlit or even severely sidelit.  For example, this might be a perfectly usable photo, but it doesn’t quite have the instant eye-catchiness of better sports photos – the entire image is really busy because the brightest-lit areas are the least detailed (field, crowd in background), and the important areas (player’s faces, bodies) are masked in shadow.

Washington State's Christopher Ivory about to collide with California linebacker Anthony Felder

Washington State's Christopher Ivory about to collide with California linebacker Anthony Felder

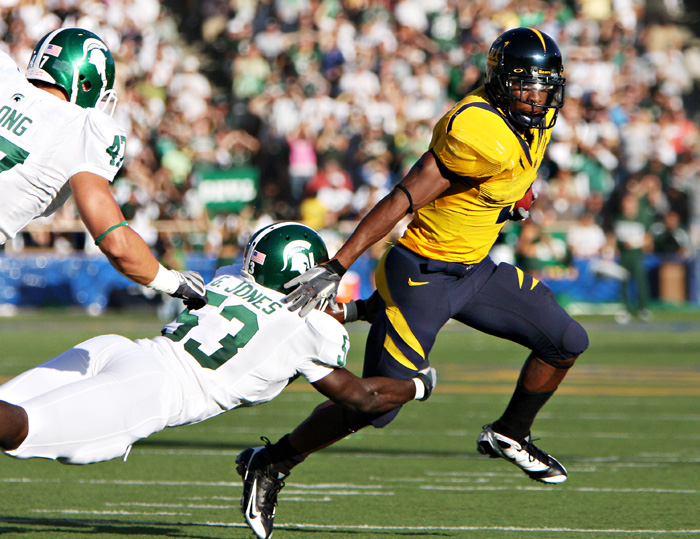
Contrast this to this fully-lit photo (actually sidelighting from the right, but the player is facing that direction anyway).  Now the brightest (and instantly eye-catching) area of the image is the player’s body and face, which also happens to be the most detailed area and the focus of the image:


California running back Jahvid Best evades Michigan State tacklers

California running back Jahvid Best evades Michigan State tacklers

The key for daylight then (without clouds) is to get into a position where the sun is coming from behind or to the side of you (but still relatively behind, if possible).  Since most games are noon or later, the sun will tend to be on the west side where it sets, so the preference would be to shoot from the west end of the stadium (of course, you may not have this luxury, as sometimes they restrict you to the visiting team’s sideline).  Another strategy is to simply shoot from the endzone – most all football stadiums are oriented facing north-south to avoid playing directly into the sun during sunlight games, so at the very worst you’ll have a side-lit image, which often isn’t bad at all, as the above photo shows.

A closer look at more difficult shaded and nighttime lighting conditions after the jump.

(more…)

Aperture-priority Exposure Technique (Sports Outside)

Use aperture priority. Why? In dynamic lighting situations (which will be anywhere outdoors), your lighting will be all over the place as the sun starts to decline, clouds roll in, and players move in and out of shaded regions (or for stadium lighting, the better-lit sidelines). There is simply no way to manually adjust the exposure parameters, even if you can think quickly enough to know which settings to switch to.

Use the largest aperture. This goes almost without saying – you want to isolate your subjects in sports photography, and the best way to do that (given a certain camera/lens setup) is to use a wide-open aperture. This also has the advantage of letting in as much light as possible. The margin of error for focus *will* be thinner, but this really shouldn’t be an excuse or barrier to return inferior shots taken at smaller apertures just because it’s easier. Take the out-of-focus shots as they come – every ruined shot should just be an incentive to learn how to effectively track subjects and utilize your camera’s AI Servo/continuous focusing abilities.

Maintain a fast shutter speed in the shaded region. The goal here is to have a fast enough shutter speed to avoid blur, and with your aperture stuck at wide-open, you’ll do that by manipulating your ISO sensitivity. Since you’re shooting in a situation with dynamic lighting, you want to choose the ISO that will give you the necessary speed in the darkest area (i.e. in the shaded portion of the field, or when a cloud rolls by and blocks the sun). If you’re maintaining a decent enough speed in the dark areas (say 1/500s), then you’re guaranteed to get a decent speed in any other area, since it’ll be brighter (if you’re getting 1/500s in the shade, you might get 1/2000s in the sun). Does this mean you’ll be using a higher-than-necessary ISO when you’re in the brigher areas? Yes (if you’re getting 1/2000s in the sun, that means you could drop the ISO 2 stops and still get your 1/500s minimum). However, the noise is going to be a minor problem at the lower ISOs where you might deal with this half-lit, half-shaded situation (the difference between ISO100 and ISO400 is virtually indistinguishable), and in any case you’re only over-using high-ISO in the brighter area, where your noise is going to be less (due to greater amount of light) than whatever you’ve already accepted putting up with in the darker area.

The real important point here is that at all costs, you want to avoid slow shutter speeds, since blurred out pictures are completely unusable and unsalvageable, while most agencies (and any skilled photoprocessor) can put up with a relatively huge amount of noise. So take the noise hit in the brighter situations (which is not going to be that much) if it will help you get rid of blur in the darker regions (which is going to be a huge problem)

Keep track of your shutter speeds as lighting dims. Over the course of a late-afternoon to evening game, the sun is going to set and you’ll gradually see light levels drop, and concurrently, the need for longer shutter speeds and higher-ISOs to compensate. If you’ve got some sort of auto-ISO feature on your camera that helps to maintain a specified shutter speed by adjusting the ISO, use it. Otherwise you’ll have to monitor your shutter speeds as the game goes along and bump up your ISO periodically as you see the shutter speeds dip below the motion blur threshold you want.

Consider center-weighted metering with dynamic secondary elements. In most situations, the default evaluative/matrix/segmeneted metering mode on the camera will do a fantastic job of determing correct exposure.  Where these metering modes often get confused is with highly dynamic secondary elements in the image – very dark shadowed stands in the background, or very bright field in the foreground of a shadowed area.  This throws off the metering and makes the camera think the scene is darker or brighter than it really is in situations like rolling clouds or sunset, where the field (or parts of it) may rapidly become lit or unlit.  The solution for this is to use a center-weighted metering mode that will bias the exposure towards your selected subject.  This way things like a dark background or very bright foreground won’t have any effect on exposure – the camera only looks at your primary subject and determines the correct exposure for that, which is all we care about.  Of course, the potential danger in this is that an athlete’s dark or white jersey will similarly throw the camera’s metering off – the best compromise is probably to use a broader center-weighted focusing mode, such as partial metering or center-weighted average, to include more of the surrounding area and balance out extreme variations.

This is part 2 of 4 in Football Photography X’s and O’s, a 4-part series of insights on shooting football.

Part 1: Equipment Analysis 1 (Michigan State game)
Part 2: Aperture-priority Exposure Technique
Part 3: Lighting Situations
Part 4: Equipment Analysis 2 (Washington State game)
Football Photography X’s and O’s, Part 1: Equipment Analysis 1

Life is full of little small choices, and then there are the big decisions.  Namely, 70-200mm f2.8 on a 1.3x crop or 400mm f2.8 on a 1.5x?

I recently had the opportunity to shoot a couple of football games for the paper I work at, The Daily Californian.  It was my first time shooting football game, and as someone who’s generally not been very good at sports photography, I was definitely a bit nervous.

Both games I shot were in pretty good light – the UC Berkeley/California vs. Michigan State game started at 5pm, so it played from daylight through to just about dusk in the 4th quarter.  The Washington State game began at 3pm, so it was pretty much daylight except for a bit of (rather nice) sunset light at the end.

Sunset at halftime at Memorial Stadium, UC Berkeley

Sunset at halftime at Memorial Stadium, UC Berkeley

Equipment analysis – Week 1 vs. Michigan State

The biggest difficulty with football with regards to equipment is covering action that happens over a vast expanse (over 5000 m2 of field area) that can be traversed by speedy athletes in a matter of seconds.  So while you might be sitting nice and cozy with a 300mm lens that perfectly covers the action mid-way across the field, all of a sudden the quarterback can fire off a deep pass or the running back finds a hole and flies off, and you’re stuck without the ability to get the shot.

(more…)

Vincent Laforet 5D Mark II Video

With the recent announcements of the D90 and perhaps more prominently the 5D Mark II (since it actually has the features to make video usable… like AF and external mic jack), photography circles have been alight with excitement (and a fair amount of naysayer criticism) about video on SLRs.

It’s probably no secret where I stand on video capabilities for still cameras.  While we’ve seen only boring tripod-mounted sample videos so far, Canon’s just put out a short film, Reverie, made by Vincent Laforet:

http://www.usa.canon.com/dlc/controller?act=GetArticleAct&articleID=2086

Vincent’s blog post here: http://blog.vincentlaforet.com/2008/09/22/without-further-ado-reverie/

Image quality is absolutely stunning, but I have to admit, the 30fps just kills me while I’m watching it – the level of immersion is just not the same.  The video world needs 24fps (or better yet, variable fps to any number!).  PLEASE.

UPDATE: The links above no longer work, but the video has been reposted.

Adobe CS4 – new Pshop (Photoshop) and Bridge!

Adobe's new Photoshop CS4

Adobe's new Photoshop CS4

Today is the day Adobe announces the new Creative Suite 4 (CS4), which comes with a whole slew of new Adobe products for everything from grahic design to layout management to video editing to flash animation.  For us photographers, the headline here is going to be new versions of Adobe Photoshop CS4 and an updated Adobe Bridge CS4.

A quick headline of particularly interesting (to me) new features in the new Photoshop (here’s Adobe’s pdf if you’d like to read through all the changes yourself):

  • “Adjustments panel” with nondestructive tools: One of the great things that Lightroom showed photographers was non-destructive adjustments – things like curves or saturation adjustments could be applied and undid later, and the adjustment settings could also be picked up and applied over on other images.  While this has been possible for awhile in Photoshop with adjustment layers, I know that I’ve simply opted to go for a direct curves or saturation adjustment most of the time because it’s so much quicker to access, so maybe this changes things.
  • “Vibrancy” adjustment: Users of Lightroom or even Adobe Camera Raw have probably seen this – vibrancy is simply a sort of saturation+local contrast enhancement tool.  Nothing that couldn’t be done before, but surely a tool that those who’ve never experimented with local contrast enhancement will be delighted with.
  • Photostiching tools: The new CS4 also features a “Photomerge” tool that promises to blend together multiple images into panoramas, complete with “vignetting and geometric distortion corrections”, as well as automatic detection of extreme fisheye distortion, apparently.  I haven’t been totally happy with current photo-stitching program, Autostitch, thus far, so maybe this is a real answer.
  • Content-aware scaling: Some of you may have seen this video of resizing algorithms known as “content-aware scaling” or “seam carving”. Rather than directly scaling an image (which will often distort the information) or cropping an image (which cuts out useful information), seam-carving looks for vertical or horizontal “seams” of least-important image data, and deletes these, resulting in a downsized image (or upsized, even) that preserves the detail and proportion in the most important image elements. While it’s not going to have much practical application in everyday photo-editing, there are certainly some useful applications, especially if you can apply seam weights to remove certain elements of the image. Content-aware resizing video:
  • Focus-bracketing autoblending: By far one of the coolest, exciting, most useful tools to be introduced in Photoshop.  Macro shooters are well aware of the limitations of depth of field – even stopped down to something absurdly small like f/32, depth of field can still be razor thin, depending on the magnification.  Focus blending works by blending together bracketed focus distnaces, combining the in-focus regions of each image to effectively generate an image with larger depth of field.  For example, if your depth of field only extends +/- 1 mm, you can take a shot at 10mm distance, 8mm distance, and 12mm distance, and get a depth of field range spanning 7-13mm rather than 9-11mm you’d get from the 10mm distance shot by itself.
  • Leveraging the GPU: Photoshop CS4 also promises to make use of the extra processing potential available in video card GPUs – potentially a boon when doing intensive tasks like scaling images, especially at scales that aren’t binary powers of 100% (50%, 25%, 12.5%, 6.25%).
  • Localized adjustments in Adobe Camera Raw 5: Adobe Camera Raw has been in many ways a groundbreaking new approach to image processing compared to the old, stale formula that Photoshop used to use (and still does, to an extent).  With its slew of sliders to apply filters on top of an image, rather than using filters to transform the actual data of an image, ACR provided non-destructive editing in a simple and quick interface (something that Adobe Lightroom also features).  The limitation that prevents ACR from almost completely replacing Photoshop for the most basic edits is a relative limitation in the fine-tuning of filters (ACR gives a single “fill light” slider, for example, while Photoshop offers a Shadows/Highlights tools with three paramters for amount, threshold, and radius) and the lack of localized edits (applying that curve adjustment to only a portion of the image, rather than the whole thing).  ACR5 promises to address the latter issue, at least, with a “paint tool” to designate areas where filters are to be applied, much like layer masks in Photoshop.
  • Tabbed image interface: The trend of tabbed interfaces has proliferated everywhere, although I’m not really convinced of its usefulness for something like an image editing application.  Tabs work great for browsers because you’ll want to open up other pages and perhaps switch back and forth quickly.  In my processing workflow, I’m usually opening up one image at a time, processing it, and closing it before moving to the next one.
  • 64-bit support!: Adobe is finally moving to 64-bit with CS4 (for Windows only – sorry Macfans).  Despite mainstream digital cameras now moving to 20+ MP and their increasing filesizes, most users probably won’t see huge dividends from the move to 64-bit, although you might if you’re processing large numbers of images at once or dealing with ginormous TIFFs or RAWs from the medium format megapixel monsters like the Phase One P65+.
  • Live-preview for healing brush and clone tool: thank goodness, one of the most annoying usability limitations of these tools for a long while (clone and healing tool basically copies in other pixels into an area whose pixels you want to replace.  Needless to say it’s been a pain doing this semi-blind).

The verdict?  As always Adobe introduces a bevy of appealing and honestly useful goodies.  The UI and performance improvements will have to be test-driven before anyone can make a real judgement, but the feature list of new tools is strong, if leaning a bit to the power-user side (how many average users would really use seam-carving or focus-blending tools on a regular basis, even if they’re fascinating pieces of technology?).

Despite all the new tools, I don’t see the possible of Photoshop workflow changing in any fundamental way (à la processing through Lightroom or ACR), which is a bit of a shame because I think the non-destructive and replicable adjustments offered in Lightroom are far better suited to the workflows of most photo processors – they just need some of the fine-tuning options and localized editing that Photoshop offers to make them complete.  But at this point, Photoshop’s workflow has been so deeply embedded into the habits of so many that I don’t think Adobe could fundamentally change Photoshop if they could, which is why you’ll increasingly see Photoshop development centered on graphic design and 3D imaging and animation, as with the Photoshop Extended version of the program.

Photokina 2008 Goodies, part 1

Meaningful content is coming soon, but today’s the start of Photokina, a semi-annual trade show for the photographic and imaging industries where camera makers debut their new products. It’s day 1 and we’ve already got a slew of interesting announcements so far:

Nikon 50mm f/1.4G AF-S lens

Nikon 50mm f/1.4

Nikon 50mm f/1.4

Press release

Nikon users (and particularly all those D40/60 owners) have been waiting for this one for a long time, and it’s finally here: a (semi) affordable large aperture prime lens with a sonic motor that will focus with decent speed (or focus at all).  Previously Nikon users have had to deal with a slew of ancient lenses from the screw-driven era of autofocus – they weren’t really fast enough for fast action, didn’t even autofocus with the newer D40/60 bodies, and on top of that the optics really didn’t compare to more modern designs like Canon’s 50mm f/1.4 or Sigma’s monster 50mm f/1.4.

Nikon is promising a “newly developed optical system” with this one, so there’s at least the potential for it to perform much better than the current 50 f/1.4, and given how old the optical design is on that, it should.  Whether it stacks up with Sigma’s 50mm f/1.4 is the big question – initial pricing seems to be $440, which would undercut the Sigma’s current $500 price.  Given that it’ll be the “brand name” Nikon, it will sell bucketloads, and for a lower price and much more compact size (73.5mm diameter, 54mm length, 280g vs. 84.5mm, 68.2 mm, 520g on the Sigma) would be the more appealing option anyway for most users who aren’t obsessed with having the absolutely top-flight image quality.

More on the Nikon 50 1.4, Olympus Micro Four-Thirds mockup, Panasonic G1, Leica S2 MF dSLR, and Samsung HZ1 compact ultrazoom.

(more…)

Hello, world!

DP Decal Class on week 1 (Fall 2008)

DP Decal Class on week 1 (Fall 2008) - excited and ready to go!

Hi everyone, and welcome to CameraSex/ShutterSounds, a blog on all things photography.  This has been a dream pet project of mine for some time, and after several tried and failed attempts using blogger and an old personal xanga, I feel like I’ve finally got the infrastructure set for it to succeed.

So what’s this blog all about?  I’ve had a keen interest in photography and specifically digital camera technology for awhile – as an electrical engineer I just have a natural tendency to take interest in and figure out the ins-and-outs of one of my most-used tools.  You can expect some how-to’s, shot walkthroughs, some technical explanations, market news, and what will probably be my favorite topic, product analysis.

In addition to simply expounding my own thoughts on the photographic world, I’m hoping to use this blog as a forum for discussion.  One of my other photo-related activities is instructing a digital photography class at UC Berkeley (the “EE98/198: Digital Photo Decal” at www.photodecal.org).  At the moment it’s a fairly basic photographic science class, and with the usual 12-week schedule, there’s not much room to expand into more advanced topics, so hopefully this can also be a platform for touching on some more advanced topics that I normally wouldn’t get a chance to visit.

Stay tuned – insights, analysis, and interesting articles to come!