Archive for the ‘Skills of the Trade’ Category

A Quick Idea – Image Sensor Based on Time-to-saturate

Apologies (as always) for the infrequent updates to this blog. This semester has been a lot rougher than in the past, so I don’t know if I’ll have time to post anything more until the end of break.

I had a quick idea I wanted to jot down, and I haven’t found anything on it. I feel like someone out there must have thought up something similar already, or it’s already in the works at some black lab of a sensor company or something.

The idea I have is an image sensor that measures light intensity based on time-to-saturate – the time it takes for a particular photowell (representing a pixel) to saturate to its maximum capacity. The concept I’ve come up with has some interesting theoretical advantages in dynamic range over conventional photon-counting designs used today.

Imaging today – photon counting

First, a layman’s overview of how the conventional photon-counting design works in today’s sensors:

The sensor is a light sensitive device, and whenever photons come into contact with it, they are absorbed and a proportional number of photoelectrons are “knocked out” by the photon energy and collected in a photowell. From this photowell, a voltage measurement is taken, and this ultimately translates to a brightness value in the resulting image. In essence: Image brightness ∝ voltage reading ∝ electrons collected ∝ photons collected.

When taking an image, there is a set exposure duration, often referred to as a “shutter speed” in photography terms. This defines the time when a sensor is exposed to and detecting light – the exposure starts, light hits the sensors, exposure stops, and then we count the photons.

A limiting factor in this design is the photowell capacity. The number of electrons that can be stored in a well is finite, and once the photowell capacity is saturated, any additional electrons are not collected and hence the photons they correlate to are not counted. On the flipside, there is also a noise floor, where enough electrons must be gathered to produce a signal that is discernible from the random signal variation due to various forms of dark (thermal), electronics (read), and shot (photon) noise.

These two attributes lead to a problem of dynamic range – in scenes where light intensity differs greatly between the darkest and brightest areas, the sensor is simply unable to measure the full range of brightnesses and must cap measurements above and/or below a certain threshold.  This leads to the “blown highlights” and “crushed shadows” attribute often found in photos of large dynamic range scenes.

Time-to-saturate

The idea behind a time-to-saturate sensor is fairly simple. What we aim to measure in an image is light intensity – the flux of photons per time per area. The area is cancelled out of the equation by the photosite corresponding to a pixel being a certain area, so the measure we are really after is photons per time, for each pixel.

With photon counting, we fix a shutter speed (time duration), and then count the number of photons (via voltage measurement of photoelectrons) captured in that span, and use both to derive the intensity:

Intensity = photons / time = photons recorded / shutter speed

In time-to-saturate, the photon count is fixed at the capacity of the photowell, and the variable we measure is the time it takes for an individual well to saturate fully to the capacity.

Intensity = photons / time = max photon capacity / time-to-reach max-photon-capacity

How would the system work exactly? With a time-to-saturate sensor, we use as long a shutter speed as needed to fully saturate all photowells (in a conventional sensor, this is the minimum shutter speed to generate an all-white (max brightness) image). At the moment a photowell reaches capacity, it records a timestamp which will indicate how long it took to reach capacity. Once the exposure is finished, we are then left with a two-dimensional array of saturation times, rather than photon counts. Rather than recording 100k photons at one photosite, and 50k photons at a neighboring photosite where light was half as intense, the readings we get from this sensor would be along the lines of 1 millisecond time-to-saturate for the first photosite, and 2 millisecond time-to-saturate for the second, half-intensity photosite.

Key Advantages

There are two key advantages in our ability to take light intensity readings, both ultimately advancing dynamic range:

  • There is virtually no limitation to the range of highlights we can capture, unlike the limitation imposed by the photowell capacity with photon-counting sensors. In our example, if there was a third photosite which had double the intensity of the first 100k photosite, and was exposed to 200k photons, it would only end up recording 100k photons since this is the capacity of the photosite, and thus both pixels would record the same white (max brightness) value, even though the 200k photosite pixel clearly represents a brighter area in the scene than the 100k photosite. A time-to-saturate measurement, by contrast, would simply produce a shorter time measurement: the 200k photosite saturates in 0.5 milliseconds, which we can compare to the 1 millisecond measurement for the first photosite and clearly conclude that the 200k photosite is twice as bright.
  • Noise levels are reduced to the level of a maximally-saturated photowell. In a photon-counting sensor, any photosite that does not record a max white value by definition recorded a fewer number of photons, and thus produces a sub-optimal signal-to-noise ratio (SNR). Photon or “shot” noise has a standard deviation of the square root of the signal – thus for 100k photons we have √(100,000) = 316.2 photons of standard deviation, and a SNR of N/√(N) = √(N) = 316.2. For 50k photons, however, we have an SNR of √(50,000) = 223.6. In contrast, all photosites in a time-to-saturate sensor reach the max well capacity, and will thus all have the max SNR. This ensures that all photosites record values well above the noise floor, and additionally reduces photon noise for all pixels to the level of a maximally saturated photosite (the 100k photon, 316.2 SNR in this example).

In theory, such a sensor would have an infinite dynamic range – the brightest intensities are simply recorded as short time-to-saturate durations, and enough samples are recorded from the darkest areas to place the measurement well above the noise floor.  This would have huge implications for large dynamic range photography and imaging in general, to be able to record the entire dynamic range of a scene in a single exposure, without having to resort to processing tricks like selective shadow/highlight adjustment or high dynamic range (HDR) blending.

Potential Feasibility Issues

I’m not aware of any sources that have thought of this idea before, but if there are then there must be some large feasibility (or perhaps cost) issues that have prevented its development thus far. The few issues that I can imagine, none of which seem like dealbreakers and none of which would place performance any worse than that of photon-counting methods, in theory:

  • Timing accuracy/precision of photowell saturation. While photon-counting relies on accurate and precise voltage readings from the photowells, a time-to-saturate sensor would need good accuracy and precision in recording time when a photowell reaches saturation. How precise does the time need to be, to equal the theoretical precision of today’s cameras? Taking the contemporary example of a 100k photon capacity photowell, hooked up to a sensor/imaging pipeline with a 14-bit analog-to-digital converter (found on most high-end cameras today), we would need to quantize measurable photon counts into 2^14 = 16,384 steps. 100,000 / 16,384 = ~6 photons, which is the precision we need to be able to measure time-to-saturation by. Most high-end cameras today operate with a minimum shutter speed of 1/8000 second (125 microseconds) – a 100k photowell that fully saturates in this time (this is the maximum light intensity the photon-counting sensor is able to record, under any settings) is thus 100,000 photons/125 microseconds = 800,000,000 (0.8 billion) photons / second.  Finally, we use this intensity along with our 6 photon steps to arrive at 6 photons / (0.8 billion photons/second) = 7.6 nanoseconds. This is the precision with which a time-to-saturate sensor needs to record time by. Of course, depending on the application the numbers can vary – with fewer bits per pixel, we would need less precision (an 8-bit jpeg in this example would need just ~0.5 microseconds of precision), with lower photowell capacity we would need greater precision, and with a larger minimum exposure time we would need less precision.
  • To take advantage of the greater dynamic range capabilities of a time-to-saturate sensor, the exposure duration must be longer than a conventional photon-counting sensor, to capture more light. For static scenes, this is unlikely to be an issue, but for dynamic scenes (e.g. moving subjects), the exposure duration can only be stretched so far before issues such as motion blur or camera shake blur are introduced. At worst, however, the exposure can simply stop after a defined maximum exposure time – at this point any photowells which have not reached capacity simply output a voltage reading like in a conventional sensor – this reading is then used to extrapolate a time-to-saturate which can then be compared with the other photosites. In the worst case, the maximum exposure time is the same as the exposure time in a conventional photon-counting sensor, and would produce an noise level and at least the same dynamic range, if not a greater dynamic range captured in the highlights. For any exposure duration exceeding that of the conventional sensor however, noise levels will be reduced and a greater dynamic range in the shadow regions will be achieved as well.

What do you think?  Any potential pitfalls or feasibility issues I might have missed? I’m especially interested if anyone has come across a source with similar ideas before. Feel free to post links in the comments!


An explanation of Fujifilm’s Super CCD EXR sensor

A look at Fujifilm’s innovative EXR sensor, the latest iteration of its flagship Super CCD sensor, along with some analysis of images from production cameras. Admittedly this would have been more interesting as a speculative piece a year ago, but better late than never

tl;dr: Fujifilm’s EXR sensor is extraordinary, mostly for its dynamic range. If you’re after the best non-DSLR image quality around, your choices start at the Fuji F200EXR, F70EXR, S200EXR, and end there.

Fujifilm has long been a leader in revolutionary sensor technology, particularly at the smaller scale sensor market where the majority of manufacturers have long been content pumping out traditional, vanilla CCD sensors with square grid-based Bayer Filter Arrays.

In September of 2008, announced plans for their latest sensor: the Super CCD EXR, which combines the unique color filter array (CFA) and pixel binning features of various previous sensors into a single “switchable” sensor that can be optimized in one of several areas (which are typically mutually exclusive when designing a sensor): high resolution, high dynamic range, and low noise.

High resolution

High resolution mode is the default mode, which utilizes the full set of photosites on the sensor and produces an image with a corresponding pixel on each photosite – nothing too special here, though Fuji claims the diagonal layout of photosites (as opposed to simple square grid) helps to improve resolution.

High sensitivity

A comparison of a typical Bayer CFA (left) and the CFA on Fujifilm's new EXR sensor (right)

The second mode of operation for the EXR sensor is a high-sensitivity mode which Fuji calls “Pixel Fusion Technology”, which is fancy marketspeak for pixel-binning (combining reading from adjacent pixels together to produce a better signal). With the EXR’s pair-based CFA layout, Fujifilm claims that interpolation (and thus color resolution) will be more accurate because the binned pixels are closer together (e.g. the pair blue pixels are pretty much in the same location, while they’re separated by two pixel lengths in a standard square-grid Bayer array. I don’t know that I buy this argument particularly well – it’s true that same-color pixel values will be more accurate since they’re closer, but you can’t get something for nothing: for example, the average distance from red-to-blue is going to be increased, which lowers accuracy for interpolating blue values at red pixels.

(more…)

The Demosaic Project

So over the past couple of weeks I’ve been working on a little project called Demosaic.  It’s a little online demo that interpolates image data from (simulated) raw sensor output, similar to what almost every digital camera used today has to do.

http://www.thedailynathan.com/demosaic/

(more…)

Making the Shot: Election Night in Berkeley, Part 3

So the last and final installment here is all about my third and last trip out to cover the election story, which finally resulted in the little image that ended up gracing the cover of the next day’s special Elections issue:

Cover - Daily Cal Elections special issue

Cover - Daily Cal Elections special issue

As the clock struck midnight and November 5th dawned, I was just headed out of the office after dropping off the rest of my photos from the massive crowd that had gathered down on the streets outside at Bancroft & Telegraph.  The photo editors Anna and Victoria were still in the office (and would be through to the morning) sorting through photos and compiling the photospread (.pdf, 7.2mb, pg 7-8)  that would appear in the next day’s paper, for which the Daily Cal photo staff had already collectively compiled a few hundred photos.

At this point I would say I was pretty content but not particularly happy with the photos I had come back with.  The shots from the viewing party were good – slideshow or photospread worthy – but I wasn’t particularly fond of any of the crowd photos from the celebration on the streets.  Sure they covered the event, but photos like this or this aren’t really going to rock anyone’s socks. (more…)

Making the Shot: Election Night in Berkeley, Part 2

So when I originally planned this article, it was a couple days after the November 4th election and all the craziness that ensued.  So I suppose, more than a week after the actual inauguration, this isn’t exactly the most relevant anymore, but I’d like to hope that these photos (and whatever lessons gleamed from them) are somewhat timeless.

For the Daily Cal’s election night coverage, I was initially assigned to cover the results watching party held at the Institute of Government Studies (IGS) Library at Moses Hall.  After I had gotten back to the office and was in the midst of sorting through and cutting down my images, we started hearing a crowd gathering outside.  So most of the people in the office went over to the Bancroft-facing windows and found this:

Part II: Berkeley Street Celebration

Election night crowd on Bancroft

Election night crowd on Bancroft

Like any good photojournalist, the next thing I did was to hop in the elevator and leap down into the fray. (more…)

Making the Shot: Election Night in Berkeley, Part 1

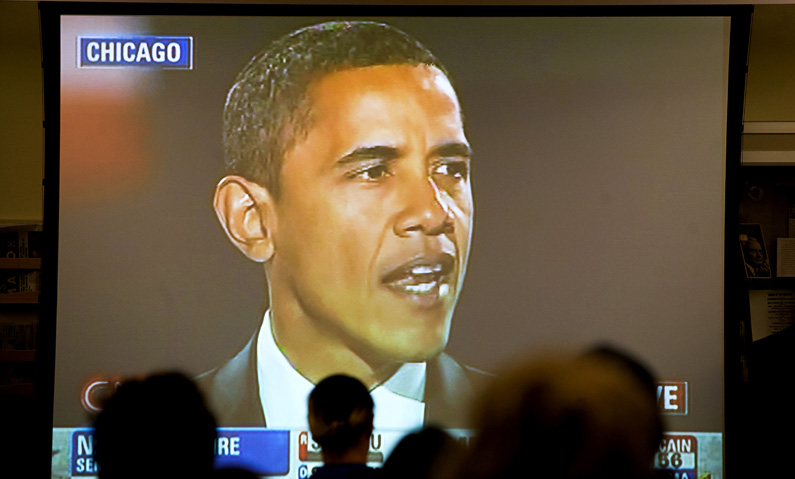
By now many of you have probably seen the Daily Cal photos and slideshows, as well as the election issue front cover.  Election night was an all streetlamp-lit night photography affair, which is pretty much the pinnacle of low-light difficulty (unless you were to cover news by moonlight, I suppose).  Combined with all of the fast-paced action, it made for one of the more challenging shoots in my favorite specialty area.

Members of the public watch a broadcast of Senator Barack Obama's victory speech at the IGS Library in Moses Hall

Members of the public watch a broadcast of Senator Barack Obama's victory speech at the IGS Library in Moses Hall

Part 1: Results Viewing at Moses Hall

I had classes throughout the day on Tuesday, so the first event I caught was the viewing party for members of the public (mostly Cal Dems) at the Institute of Government Studies (IGS) at Moses Hall.  There was a large screen set up inside the IGS library, where a crowd of mostly tepid adults were watching.  I stayed here for a few minutes, but it quickly became apparent that this was probably the least energetic group of election results viewers in the entire city – the entire crowd sat throughout the broadcast in absolutely silence, without a single cheer or handclap as each of the states in the presidential race were called.  Meanwhile, the group of students watching under an outdoor tent set up in the courtyard between Moses and Stephens Hall were letting out whoops and hollers that could be heard through the windows, so I decided to head out there in hopes of catching a little more enthusiasm.

(more…)

Football Photography X’s and O’s, Part 4: Equipment Analysis 2

Last time I left off, I had finished shooting my first football game and was left partially satisfied with most of my setup, yet wanting a bit more, especially on the very long end. For my second game the very next week, I traveled out with the team to Palouse, Washington, for an away game against the Washington State Cougars.

Clear skies in Palouse, WA at Washington State's Martin Stadium

Clear skies in Palouse, WA at Washington State

Since the wide and mid-range setup worked just fine, I decided to stick with that, but on the long end I brought a Nikon D200 and Nikon 400mm f/2.8 non-VR lens (Nikon, yucky!).

Long range: Nikon D200 with 400 f/2.8 (35mm equivalent: 600mm f/4.2)
Midrange:  Canon 1D Mark II with 70-200 f/2.8 IS (35mm equivalent: 91-260mm f/3.6)
Wide: Canon 5D with 24-70 f/2.8 (35mm equivalent: 24-70mm f/2.8)
Ultrawide: Canon 5D with 12-24 f/4.5-5.6 (35mm equivalent: 12-24 f/4.5-5.6

Handling the 600mm Beast

Compared to the Canon 40D with 1.4x teleconverter and 70-200 f/2.8 IS I had last time, the D200 equipped with a big prime like the 400 f/2.8 was a very different kind of beast.  To start off, the setup was far more clunky – while a 70-200 and 40D can easily sling over your shoulder or around your neck, and can be handheld without a problem, the 400mm is heavy and on top of that really needs to be used with a monopod.  This is problematic in a few ways:

(more…)

Football photography X’s and O’s, Part 3: Lighting Situations

One dramatic difference you’ll while shooting a football game is how the light changes if you’re shooting a game that overlaps the sunset. This first game I shot ran the full gamut from daylight to sunset/shade to stadium lights. Experienced sports shooter should already known to shoot in aperture priority, but for those who are relatively new to this sort of thing, see this post for some points about exposure technique for outdoor sports using aperture priority.

Daylight

Anyhow, full daylight creates problems with extremely harsh shadows, particularly on player’s faces under helmets and such.  The problem is exacerbated if you’re shooting at an angle where the player is backlit or even severely sidelit.  For example, this might be a perfectly usable photo, but it doesn’t quite have the instant eye-catchiness of better sports photos – the entire image is really busy because the brightest-lit areas are the least detailed (field, crowd in background), and the important areas (player’s faces, bodies) are masked in shadow.

Washington State's Christopher Ivory about to collide with California linebacker Anthony Felder

Washington State's Christopher Ivory about to collide with California linebacker Anthony Felder

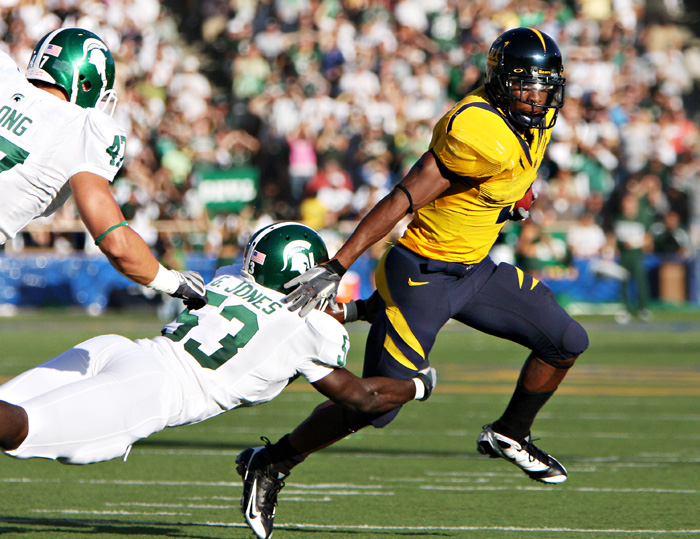
Contrast this to this fully-lit photo (actually sidelighting from the right, but the player is facing that direction anyway).  Now the brightest (and instantly eye-catching) area of the image is the player’s body and face, which also happens to be the most detailed area and the focus of the image:


California running back Jahvid Best evades Michigan State tacklers

California running back Jahvid Best evades Michigan State tacklers

The key for daylight then (without clouds) is to get into a position where the sun is coming from behind or to the side of you (but still relatively behind, if possible).  Since most games are noon or later, the sun will tend to be on the west side where it sets, so the preference would be to shoot from the west end of the stadium (of course, you may not have this luxury, as sometimes they restrict you to the visiting team’s sideline).  Another strategy is to simply shoot from the endzone – most all football stadiums are oriented facing north-south to avoid playing directly into the sun during sunlight games, so at the very worst you’ll have a side-lit image, which often isn’t bad at all, as the above photo shows.

A closer look at more difficult shaded and nighttime lighting conditions after the jump.

(more…)

Aperture-priority Exposure Technique (Sports Outside)

Use aperture priority. Why? In dynamic lighting situations (which will be anywhere outdoors), your lighting will be all over the place as the sun starts to decline, clouds roll in, and players move in and out of shaded regions (or for stadium lighting, the better-lit sidelines). There is simply no way to manually adjust the exposure parameters, even if you can think quickly enough to know which settings to switch to.

Use the largest aperture. This goes almost without saying – you want to isolate your subjects in sports photography, and the best way to do that (given a certain camera/lens setup) is to use a wide-open aperture. This also has the advantage of letting in as much light as possible. The margin of error for focus *will* be thinner, but this really shouldn’t be an excuse or barrier to return inferior shots taken at smaller apertures just because it’s easier. Take the out-of-focus shots as they come – every ruined shot should just be an incentive to learn how to effectively track subjects and utilize your camera’s AI Servo/continuous focusing abilities.

Maintain a fast shutter speed in the shaded region. The goal here is to have a fast enough shutter speed to avoid blur, and with your aperture stuck at wide-open, you’ll do that by manipulating your ISO sensitivity. Since you’re shooting in a situation with dynamic lighting, you want to choose the ISO that will give you the necessary speed in the darkest area (i.e. in the shaded portion of the field, or when a cloud rolls by and blocks the sun). If you’re maintaining a decent enough speed in the dark areas (say 1/500s), then you’re guaranteed to get a decent speed in any other area, since it’ll be brighter (if you’re getting 1/500s in the shade, you might get 1/2000s in the sun). Does this mean you’ll be using a higher-than-necessary ISO when you’re in the brigher areas? Yes (if you’re getting 1/2000s in the sun, that means you could drop the ISO 2 stops and still get your 1/500s minimum). However, the noise is going to be a minor problem at the lower ISOs where you might deal with this half-lit, half-shaded situation (the difference between ISO100 and ISO400 is virtually indistinguishable), and in any case you’re only over-using high-ISO in the brighter area, where your noise is going to be less (due to greater amount of light) than whatever you’ve already accepted putting up with in the darker area.

The real important point here is that at all costs, you want to avoid slow shutter speeds, since blurred out pictures are completely unusable and unsalvageable, while most agencies (and any skilled photoprocessor) can put up with a relatively huge amount of noise. So take the noise hit in the brighter situations (which is not going to be that much) if it will help you get rid of blur in the darker regions (which is going to be a huge problem)

Keep track of your shutter speeds as lighting dims. Over the course of a late-afternoon to evening game, the sun is going to set and you’ll gradually see light levels drop, and concurrently, the need for longer shutter speeds and higher-ISOs to compensate. If you’ve got some sort of auto-ISO feature on your camera that helps to maintain a specified shutter speed by adjusting the ISO, use it. Otherwise you’ll have to monitor your shutter speeds as the game goes along and bump up your ISO periodically as you see the shutter speeds dip below the motion blur threshold you want.

Consider center-weighted metering with dynamic secondary elements. In most situations, the default evaluative/matrix/segmeneted metering mode on the camera will do a fantastic job of determing correct exposure.  Where these metering modes often get confused is with highly dynamic secondary elements in the image – very dark shadowed stands in the background, or very bright field in the foreground of a shadowed area.  This throws off the metering and makes the camera think the scene is darker or brighter than it really is in situations like rolling clouds or sunset, where the field (or parts of it) may rapidly become lit or unlit.  The solution for this is to use a center-weighted metering mode that will bias the exposure towards your selected subject.  This way things like a dark background or very bright foreground won’t have any effect on exposure – the camera only looks at your primary subject and determines the correct exposure for that, which is all we care about.  Of course, the potential danger in this is that an athlete’s dark or white jersey will similarly throw the camera’s metering off – the best compromise is probably to use a broader center-weighted focusing mode, such as partial metering or center-weighted average, to include more of the surrounding area and balance out extreme variations.

This is part 2 of 4 in Football Photography X’s and O’s, a 4-part series of insights on shooting football.

Part 1: Equipment Analysis 1 (Michigan State game)
Part 2: Aperture-priority Exposure Technique
Part 3: Lighting Situations
Part 4: Equipment Analysis 2 (Washington State game)

Football Photography X’s and O’s, Part 1: Equipment Analysis 1

Life is full of little small choices, and then there are the big decisions.  Namely, 70-200mm f2.8 on a 1.3x crop or 400mm f2.8 on a 1.5x?

I recently had the opportunity to shoot a couple of football games for the paper I work at, The Daily Californian.  It was my first time shooting football game, and as someone who’s generally not been very good at sports photography, I was definitely a bit nervous.

Both games I shot were in pretty good light – the UC Berkeley/California vs. Michigan State game started at 5pm, so it played from daylight through to just about dusk in the 4th quarter.  The Washington State game began at 3pm, so it was pretty much daylight except for a bit of (rather nice) sunset light at the end.

Sunset at halftime at Memorial Stadium, UC Berkeley

Sunset at halftime at Memorial Stadium, UC Berkeley

Equipment analysis – Week 1 vs. Michigan State

The biggest difficulty with football with regards to equipment is covering action that happens over a vast expanse (over 5000 m2 of field area) that can be traversed by speedy athletes in a matter of seconds.  So while you might be sitting nice and cozy with a 300mm lens that perfectly covers the action mid-way across the field, all of a sudden the quarterback can fire off a deep pass or the running back finds a hole and flies off, and you’re stuck without the ability to get the shot.

(more…)